

I have managed to glean some information about modding air intakes from Firebirdnation.com, my biggest problem I had was I never saw any pictures associated with the mods or the mods only showed the finished product. What I really wanted was a step by step process and pictures to help me complete the project. So what I did was interpret what a variety of post tried to describe as the "Air intake modification" and pieced together that information to compile the beginning of my project. When I figure out how to complete the project , I will post those pictures also of my progress. I would also appreciate any feedback on how to complete this project (how to run a pipe from the air box to the engine? im stumped), what you think of my beginners attempt at the mod, and if the information helped or not! Due to image size limitations per post I have to choose between multiple small photos or just three large ones so I edited down the size of my photos, if you have trouble seeing something let me know and I can post the original in a comment
![Image]()
![]()
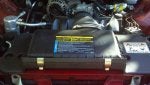
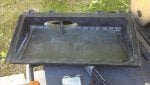
My box prior to modification.
![]()
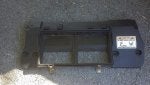
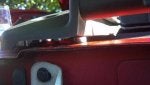
This is the lid from the air box. The baffles that I will be removing are located here. The lid comes off by pulling up the two hinges, loosening the screw on the hose and sliding the back brackets out of their holes on the back of the top.
![]()
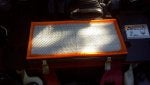
This is what you should see with the top off of the air box, as you can see I have a new K&N air filter installed, if you look close you can see 86,025 miles written in black sharpie. I like to have a idea of how long I have had a air filter in to prevent overchanging the filter (supposed to be good for 12k miles)
![]()
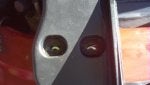
Air filter removed. Now look closely in the picture, you should see four bolts. remove those four bolts with a 10mm socket and pull the plastic assembly up and towards you.
![]()
Here you can see where the box used to be, you can see the four bolt holes easily.
![]()
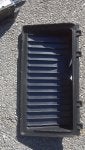
This is the bottom piece that I modified. I cut the two inner squares out using a dremel tool.
![]()
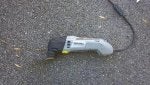
Dremel tool and attachment I used to modify my box as can be seen in the next photo.
![]()
Dremel tool used to cut the squares out in the middle to allow more airflow
![]()
Dremel tool used to remove and grind down the baffles. I then used a heat gun to melt, smooth, and create a even surface on the lid.
![]()
I put 5 washers per stack on top of the four bolt holes. I then placed the bottom of the airbox on top of the washers. I threaded my bolts through the box, through the washers , and tightened them into their respective nut. Which created, when installed, It was quite a impressive amount of space for air to flow into the box. The hood closes just fine with no box rub with five washers installed.
![]()
Top view of the description above before I placed the bolts through the bottom part and the washers.
There would of been more pictures but I can only upload 1k per FBN. If you need originals let me know. Sorry I had to edit the photos down. Please comment
![Image]()
.gif?auto=webp&fit=bounds&format=pjgp&height=1920&optimize=high&width=1920)


There would of been more pictures but I can only upload 1k per FBN. If you need originals let me know. Sorry I had to edit the photos down. Please comment


