Here is the instruction for replacing the oil pan and gasket:
I am going to make this into a tech article, so written by Robert Forney.
Removal:
1. Disconnect the Negative battery cable.
2. Remove the Air Intake Duct.
3. Raise and support vehicle.
4. Drain engine oil.
5. Drain Coolant.
6. Remove oil sensor connector (located on the oil pan).
7. Remove oil level sensor assembly (located on the oil pan).
8. Remove teh exhaust crossover pipes from exhaust manifolds.
9. Remove exhaust pipe hanger bolt/screw and reposition pipe.
10. Remove engine oil cooler host bracket nut from oil pan assembly.
11. Remove engine oil cooler bolt/screw from engine oil cooler assembly and reposition engine oil cooler hose assembly.
12. Remove transmission fluid cooler lines from clip at oil pan assembly (automatic transmission).
13. Remove starter motor.
14. Remove torque converter cover bolts/screws and cover (automatic transmission only.
15. Remove engine mount through bolts/screws.
16. Raise the engine with a hoist.
17. Remove oil pan bolts.
18 Remove oil pan assembly, reinforcements (rails), and gasket.
Install:
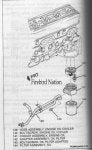
1. Apply sealant to the front cover assembly and engine block junction and to the real oil seal housing and engine block junction (look closely at the diagram posted below). Apply about 1 inch in either direction of the radius cavity of these junctions (again, look real close at the diagram posted below)
2. Install oil pan gasket, oil pan assembly, and Reinforcements. DO NOT FORGET THE REINFORCEMENTS, DO NOT FORGET THE REINFORCEMENTS (I don't want you to forget the reinforcements!).
3. Install oil pan screws/bolts and tighen corner bolts to 15 ft lbs and the remainder to 11 NM.
4. Lower engine
5. Install engine mount bolts and tighten to 70 ft lbs.
6. Install oils level sensor assembly and tighten to 16 ft lbs
7. Ubstakk Starter motor.
8. Install transmission cooler lines to clip at oil pan assembly (automatic trans).
9. Install oil cooler bolt/screw to engine oil cooler assembly and tighten to 24 ft lbs
10. Install engine oil cooler hose bracket nut to oil pan assembly.
11. Install exhaust pipe hanger screws/bolts.
12. Install exhuast crossover pipe to exhaust manifold assemblies.
13. Install oil level sensor connector
14. Lower vehicle, add oil, coolant, and asssemble air intake duct, and negative battery terminal.
![]()
![]()
![]()